How to Fix a Leaky Shower Faucet?
Leaks in a faucet generally occur when a rubber washer or seal wears out over time. Hence allowing water to seep between movable metal parts. In addition, fixing a leaking shower head with white vinegar can just increase your water bills. Fixing a compression shower faucet involves disassembling the unit and replacing the defective washers and seals. Therefore, it’s important to shut off the flow of water supply to the shower. In order to protect the surface of the tub or shower floor and cover the drain.
Remove faucet
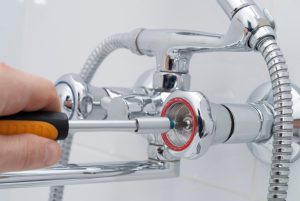
First of all, start by removing the faucet handle. Methods for doing this will depend upon the faucet’s design. Hence, older or simply-designed faucets often have an exposed screw front and centre or a locking screw in the side. Newer and more decorative models of faucets hide the handle screw beneath a cover cap. With these, you need to pry off the cover cap to expose the screw. Be careful not to scratch the finish and remove the cartridge and remove the shower stop tube.
Once you’ve removed the cover cap, use a screwdriver to unscrew the locking screw, turning it counterclockwise. Remove it and set it aside. Then wiggle and pull on the handle to extract it from the faucet body. This can be difficult to do. You can buy a faucet puller, or improvise with a screwdriver.
Uninstall the trim and sleeve
After removing the handle puller, remove the trim and the sleeve that fits over the faucet stem. You’ll need a plumber’s deep socket, to extract the faucet stem from the valve body. Fit it over the stem’s hex nut and turn it counterclockwise to unscrew the assembly. At first, you may need to apply significant force to break it free. Unscrew the faucet stem and pull it out of the valve body.
Replace faucet
Lastly, replace all faucet washers, O-rings, seals, and the flat washer at the end of the stem. Then reverse the procedures to replace the faucet stem in the valve body. So before you put it in, lubricate the threads with plumber’s grease. Tighten it in the valve body. Temporarily put the handle back on, turn on the water supply, and test the valve. Then finish reassembly. Finally, seal the trim to the wall with tub caulk.
Finally, yo know more about our services, click here.