Bathroom tiles that have sanded grout are more than unsightly, they can also result in damage if left unchecked. By following some steps, you will find that fixing this problem is not as difficult as it may initially seem.
Examine the Grout
Fully examine the entire shower unit to find every instance of cracked grout that needs repairing. Stick a small piece of masking tape next to each so that you do not lose track of it. Examining all the points of damaged & excess grout will also enable you to determine the method of repair. Grout lines that has remained firm despite being cracked needs treatment differently.
Prepare Tools and Equipments
Be aware that grout is available in different colours and, if possible, you should take a loose piece of the cracked grout with you to the hardware store so that you get the correct shade. Do not worry if you cannot get the exact match as slight shade amendments. It can be made by adding more water or grout mix to lighten or darken it respectively.
Remove Grout
Using a grout saw, remove the cracked grout by carefully running the saw across it so that you do damage the surrounding tile or any undamaged grout float. Only follow this procedure for sections of grout where the damage is extensive. Hairline cracks that do not appear to have affected the integrity of the grout rectified with grout sealer. Once this process is complete, use a brush to clear away the resulting dust. So that you are working with a clean surface that will allow the new grout to take.
Mix and Apply Grout
Mix the tile grout in a clean bucket in accordance with the instructions, making slight adjustments with small additions of clean water or additional grout to obtain the correct shade.
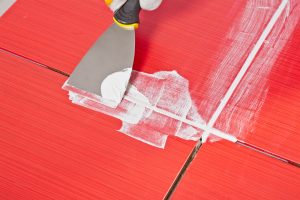
Apply the newly mixed compound to the holes created by removal of the old cracked grout. Gather some grout onto a putty knife and smooth it into the hole as cleanly as possible. As you go along, even out the surface of the new grout with a water dampened finger or a putty knife with a rounded tip. Use a damp sponge to gently wipe away any excess from around the repair site and the surrounding ceramic tiles, taking care not to damaging the tiles or remove the grout you have just applied. Allow the grout to dry completely in accordance with the manufacturer’s advice and return to it to use a cloth to buff away any traces of grout remaining on the tiles.
Seal it
Finally, seal the grout, polish the tile, clean and dry. To protect your work and to reinforce the sections of minor damage, such as hairline cracks, apply some grout sealer after the grout has dried. Leave this to dry thoroughly in accordance with the instructions before using the shower again.
To know more about shower leak or grout repair, click here.
How to repair grout in a shower?
Bathroom tiles that have sanded grout are more than unsightly, they can also result in damage if left unchecked. By following some steps, you will find that fixing this problem is not as difficult as it may initially seem.
Examine the Grout
Fully examine the entire shower unit to find every instance of cracked grout that needs repairing. Stick a small piece of masking tape next to each so that you do not lose track of it. Examining all the points of damaged & excess grout will also enable you to determine the method of repair. Grout lines that has remained firm despite being cracked needs treatment differently.
Prepare Tools and Equipments
Be aware that grout is available in different colours and, if possible, you should take a loose piece of the cracked grout with you to the hardware store so that you get the correct shade. Do not worry if you cannot get the exact match as slight shade amendments. It can be made by adding more water or grout mix to lighten or darken it respectively.
Remove Grout
Using a grout saw, remove the cracked grout by carefully running the saw across it so that you do damage the surrounding tile or any undamaged grout float. Only follow this procedure for sections of grout where the damage is extensive. Hairline cracks that do not appear to have affected the integrity of the grout rectified with grout sealer. Once this process is complete, use a brush to clear away the resulting dust. So that you are working with a clean surface that will allow the new grout to take.
Mix and Apply Grout
Mix the tile grout in a clean bucket in accordance with the instructions, making slight adjustments with small additions of clean water or additional grout to obtain the correct shade.
Apply the newly mixed compound to the holes created by removal of the old cracked grout. Gather some grout onto a putty knife and smooth it into the hole as cleanly as possible. As you go along, even out the surface of the new grout with a water dampened finger or a putty knife with a rounded tip. Use a damp sponge to gently wipe away any excess from around the repair site and the surrounding ceramic tiles, taking care not to damaging the tiles or remove the grout you have just applied. Allow the grout to dry completely in accordance with the manufacturer’s advice and return to it to use a cloth to buff away any traces of grout remaining on the tiles.
Seal it
Finally, seal the grout, polish the tile, clean and dry. To protect your work and to reinforce the sections of minor damage, such as hairline cracks, apply some grout sealer after the grout has dried. Leave this to dry thoroughly in accordance with the instructions before using the shower again.
To know more about shower leak or grout repair, click here.